If you live
in the US or Canada and you want to make more than 10 PCBs, you can order them
form PCB manufacturers such as AP Circuits. They usually charge abit more than
$US10 per board. You place an order by sending e-mail to them together with the
following files.
-
OrderForm.txt – This is the order form. See example below.
-
All the PCB files (Gerber files). - These files describe the traces on
both the component and the soldering side. They also describe drill locations
and hole sizes. You can get the GoGo Gerber files from the download page.
You need to ZIP all these files together and
send it to
staff@apcircuits.com. They normally ships the next day.
You can get the PCB files .
After submission
they will send you a confirmation e-mail and status updates. For more
information about payment or other concerns, please visit
APC website.
Here’s an example of an order
form.
Apart from your payment info, you have to
make sure the red fields correspond to the board you are ordering.
Date            ;04/08/03
First Name      ;John
Last Name       ;Doe
Address         ;1 main st.
City            ;Boston
Prov/ST.        ;MA
Country         ;USA
zC/ZIP          ;02144
Company         ;John’s Co.
Area Code       ;617
Phone           ;123-4567
Fax             ;123-4567
Email Address   ;john@johnco.com
CAD System      ;protel99se
Shipping Method ; FEDEX
Shipping ACCNT# ;n/a
Credit Card#    ;1234 5678 9012 3456
Visa/MC         ;Visa
Exp. Date       ;06/03
Cheque/MO#      ;n/a
PO #            ;n/a
SERVICE TYPE                          ;P1
Laminate Type                         ;FR4
Laminate Thickness                    ;.062
Circuit Board Size (in DECIMAL INCHES);3.90 X 2.70
Quantity Required (even numbers only) ;10
GERBER TOP LAYER FILE NAME            ;GOGO22d.CMP
GERBER BOTTOM LAYER FILE NAME         ;GOGO22d.SOL
GERBER TOP SOLDER MASK FILE NAME      ;N/A on P1
GERBER BOTTOM SOLDER MASK FILE NAME   ;N/A on P1
GERBER TOP COMPONENT MASK FILE NAME   ;N/A on P1
GERBER BOTTOM COMP MASK FILE NAME     ;N/A on P1
GERBER APERTURE TABLE FILE NAME       ;N/A on P1
ASCII NC DRILL FILE NAME              ;GOGO22d.DRD
NC DRILL TOOL SIZE FILE NAME          ;GOGO22d.DRI
SPECIAL INSTRUCTIONS FILE NAME        ;N/A
|
Disclaimer. I provide this information just as a guideline
for those who are interested. I have no connection with any of the
suppliers mentioned in this page. I cannot guarantee the accuracy of this
information and I will take no responsibility of any kind of damage it may
cause. |
[Prices are as
of Jan 2003]
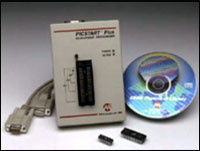
There are
many PIC programmers available in the market. Here are two examples:
-
PICStart plus from
Microchip. $199.
|
The standard beginner’s kit from Microchip. It
comes with all the necessary parts and software. Expensive. See
www.microchip.com. |
-
P16Pro40.
$19 to $42.5.
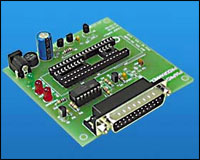 |
This is the one I use. It uses a parallel
interface and programs the PIC much faster than the PICstart plus. And it’s
cheaper. See www.picallw.com. |
In the US you can get it from
Amazon Electronics. Here are the
parts you'll need:
| Part |
Price |
Order Code |
|
P16PRO40 PIC Programmer |
$17.95
|
|
| Parallel
straight through cable |
$4.95
|
BB040 |
| AC power
supply |
$5.95 |
BB041 |
| 40 Pin ZIF
socket (Optional) |
$13.45 |
BB007 |
The P16Pro40
does not come with the necessary software to use it. Here are two programs that
work with the burner.
1.
WinPicProg. Free.
http://www.winpicprog.co.uk. Works.
2.
PicAll. $25.
http://www.picallw.com. Fully implemented with support for a wide range of
PICs.
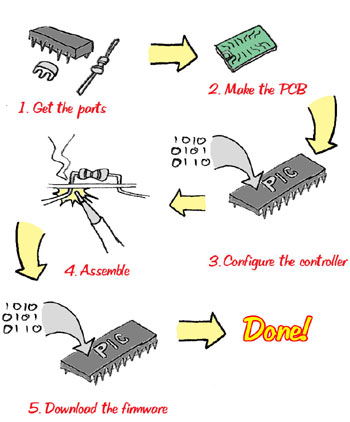
The PIC is
a general purpose micro-controller. It needs to be programmed for it to work the
way you want. This program is often referred to as the firmware. The firmware
must function according to hardware design. Thus, you need a GoGo firmware to
make the PIC work with the GoGo board.
Here’s what you need:
-
A PIC programmer. See
buying a PIC Programmer above.
-
A firmware.
This is a single .HEX file containing the code that will be programmed to the
PIC. Usually this is the Bootloader HEX file.
Here’s what you need to do:
-
Connect the PIC burner to
you computer.
-
Make sure the PIC burner
software is properly installed (MPLAB for the PICStart Plus,
PICAll or
WinPicProg for the P16PRO).
-
Burn the GoGo firmware to
the PIC.
The following is a brief
guide of how to burn the GoGo board firmware using MPLAB, PICAll, and
WinPicProg. Please consult the user guide of each program for more precise
instructions.
MPLAB (version 6.x)
-
Open the firmware
(*.HEX). Choose menu File / Import / Import to Memory.
-
Make sure the right programmer is selected by choosing menu
Programmer / Select Programmer. Make sure PICStart Plus is selected.
-
Make sure the comm port setting corresponds to the serial port
you to which you connect the PICStart Plus. Choose menu Programmer / Settings
and click on the Communications tab.
-
Make sure the processor
settings matches the PIC model you are using. Choose menu Configure / Select
Device.
-
Choose menu Programmer / Program to start the burning process.
PICAll
-
Open the firmware
(*.HEX). Choose menu File / Open Program.
-
Make sure the settings are
correct. Check menu Settings / LPT Port and Settings / Hardware. The default
normally works.
-
Make sure the PIC model
matches the one you are using. See the drop-down list on the upper right
corner.
-
Hit the “Program” button or
F4 to begin burning. It should take less than 30 seconds.
WinPicProg
-
Open the firmware
(*.HEX). Choose menu File / Open.
-
Make sure the processor
settings (drop-down list in the middle of the screen) matches the PIC model
you are using.
-
Make sure the hardware
settings are correct. Go to menu Options / Hardware. In the “Hardware
Settings” dialog box, choose the “Programmer Type” menu and choose the model
of your PIC programmer. If you don’t know. Make a guess.
-
Click Write PIC to begin
burning.
Note: I’m
not sure how stable this program is. If you run into problems, I recommend you
restart the program before tweaking the settings.
Assembling involves soldering electronic components to the GoGo PCB.
You'll need to have a soldering iron, solder, and pliers. Since the board
is designed using large soldering pads and large components, assembling a
GoGo board doesn't require much soldering skills. But please be cautious.
The soldering iron is hot. See
GoGo 2.2d
assembly guide for more information.
|