Overview | Info/Download | Documentation | Sample Projects 
Making a GoGo board | Board Variations | Links | FAQ


GoGo board library for Microworlds Logo
Multi-threaded version

User Guide

by Arnan (Roger) Sipitakiat
arnans@media.mit.edu

Please visit http://learning.media.mit.edu/projects/gogo for the latest version of this document.


Setting up the GoGo board

You first need to connect the GoGo board to the computer and power it. Please refer to the getting started guide for more information.


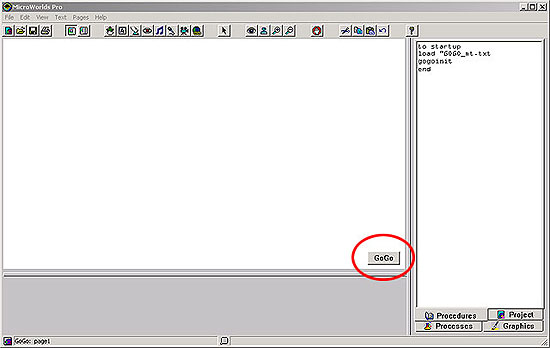
The GoGo.MW2 Template file

Using the Microworlds GoGo library is very simple. The easiest way to get started is to open the template file GoGo.MW2. It is one of the files that comes with the the GoGo library.   Figure 1 shows how the screen should look like after you open the GoGo.MW2 file.


Figure 1: The GoGo.MW2  template file

Note:
  • You need to have the file GoGo_mt.txt in the same folder for the template file to work.
  • The GoGo library works with both Microworlds 2.x and Pro.


Talking to the GoGo board

It is important to remember that you must always run a procedure called "GoGo" in order to communicate with the GoGo board. The GoGo template file provides a convenient way of doing this; You simply click on the GoGo button on the lower right corner of your project (circled in figure 1). Once GoGo is pressed, try to read from the sensor port. For example, you can type "show sensor1" in the command center. You should see a number, which is the sensor value of sensor port 1.

In the example above sensor1's value is 1023 which is normally what you get when there is not a sensor connected to the port.

Note:

The value you get from the sensor port normally represents the "resistance" of the sensor. The higher the number, the higher the resistance. 1023 is the maximum value you can get. Thus, it represents the highest resistance. It make sense to get 1023 when there is no sensor connected to the port, as electricity mostly can't travel through open-air. On the other hand, if we connect a wire to the sensor port, there will be no resistance. Thus, we should get a reading of 0.

Next, try to turn on an output port. You can type in something like "tta on" which will turn on output port A. Type "off" to turn the port off. Here's how it works.

  • tta or Talk-To-A addresses the output ports that we want to work with. This command is similar to the way we address a turtle in Logo (such as "t1, fd 100"). Once an output port is addressed, the GoGo board remembers it and the ports stays active until a different port is addressed.
  • On turns on the active ports.
  • Off turns off the active ports.


Where to go from here

Once you get the board working. You can start working with sensors, motors in your Logo projects. Please read the command reference for a complete explanation of the available commands. You should also visit the project examples page to see what others have used the GoGo board for.


Trouble shooting.

If you have problems communicating with the GoGo board, here are a few tips

  • If there are error messages in the command center, it means the problem is probably with the software setup.
  • Make sure the file GoGo_mt.txt exists in the same folder as the MW project file.
  • Make sure the serial port is not in use. This could happen in many cases such as:
    • You are running the GoGo board monitor utility.
    • You are running more than one instance of Microworlds
  • See if the serial cable is really plugged into COM1.
  • Try resetting the board.


 Last updated: 2/21/2003 6:13:38 PM