|
Contents:
Getting to know the GoGo board
There are a few parts in the GoGo board with
which you need to be familiar. Figure 1 illustrates the basic GoGo board
layout.

Figure 1: GoGo board layout
| Serial Port |
The GoGo board uses this port to connect to the
computer. |
| Power Input |
This is the main power input for the board. You
can also power the board with the optional battery pack. See
Powering the GoGo board
for more information. |
| On/Off Switch |
This is the main power switch. |
| Power LED |
This LED always lights up when there is power and
the board is on. |
| Start/Stop Button |
Starts or stop the board's stored procedures. |
| Run LED |
When lit, indicates that a stored procedure is
running. |
| Output A/B and Output
B/C |
Output Ports. You can connect to
actuators
such as motors, light bulbs, and relays to them. |
| Extension Bus |
This port allows the GoGo board to communicate
with other devices (such as an LCD display, a stepper motor
controller) |
| Beeper |
A programmable beeper. |
| User LED |
A user programmable LED. |
| Sensor Ports |
Allows connection to eight sensors (i.e. light,
touch, temperature, distance, etc). |
| Serial Activity LED |
Indicates communication between the board and the
computer. |
What you need
The following is a list of things you need in
order to use the GoGo board
 |
A GoGo board |
 |
A 9V power adapter
or a battery pack.
See powering the GoGo board
for more information |
 |
Serial cable |
 |
Sensors and
output devices (like motors, lights) |
Powering the GoGo
board
The GoGo board is designed to work at 9v.
However, this is quite flexible. Generally, anything between 6-12v
should be fine. The power can come from a standard power supply or from
a battery. Please read "Powering
the GoGo board" for more information about the power supply and how
to buy the right one.
Once the board is powered, turn it ON. You
should hear two beeps and the Run/User LEDs should blink twice.
Connecting the GoGo
board to the computer
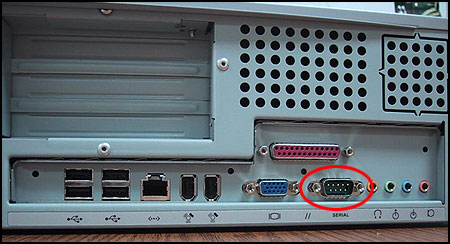
The GoGo board uses a standard DB9 male-to-female
serial cable. These cables are available at computer retail stores. You
should connect the male side to the GoGo board and the female side to the
serial port (COM port) on the computer. These ports are usually located
at the back of the computer. Some older computers have more than serial
port. In this case, I recommend using the first port (COM1); otherwise
you will need to change the configurations of the GoGo board software to
match the port you use. Figure 2 shows how a serial port looks like at
the back of a computer.

Figure 2: An example of a serial port at the back
of a computer.
Testing the GoGo
board
The easiest way to test the GoGo board is to use
the GoGo board
monitor program. You simply start the program and click on the "connect"
button. If there are no error messages, it means you are connected! You
can then try to read sensor values and turn on or off output ports.
Figure 3 shows a screenshot of the GoGo board monitor software.

Figure 3: A screenshot of the GoGo monitor
software
Where to go next?
Now that the GoGo board is working, you can start
using it in many programming environments. The GoGo board can function
in two modes: tethered and autonomous.
- Tethered Mode
- In this mode the board is always connected to the computer (via a
serial cable). It allows any programming language that can access a
serial port to interact directly with the sensor values and to actuate
various devices. You can create games, interactive art work, and many
other applications in this mode. Currently the GoGo board
has libraries to support Microworlds Logo, Imagine Logo, Squeak, Active-X compatible languages (i.e. Visual
Basic, Visual C++, MS-Office). Please visit the download page for more
information.
- Autonomous Mode - This mode
allows users to download procedures to the board. Then, the board can
execute those procedures while disconnected from the computer. This
allows users to create autonomous robots, environmental sensing
devices, and other smart objects. The language that is used to program
the GoGo board is called Cricket Logo. There are many programs that
supports this language. See GoGo
board Cricket Logo support page for more information.
|