Contents:
Knowing how sensors
work on the GoGo board
Resistance
In most cases, the value you get from a sensor
indicates the "resistance" of the sensor. Resistance is a very basic
property of any material. Metal has extremely low resistance. Thus,
they conduct electricity very well. On the other hand, plastic or rubber have
very high resistance. Almost no electricity can flow though them. That is why we use
them to coat electricity wires.
Here is a simple rule: the higher the resistance,
the higher value you will get from the GoGo board. Since air does not
conduct electricity (unless you have a very high voltage), your get 1023
(the highest reading) from a sensor port without a sensor connected.
It is then not hard to guess that when you get a reading of zero, it means
your sensor has no resistance (like a piece of wire).
There are also many sensors that change their
resistance according to some particular property of the environment.
Examples of these sensors include light, temperature, pressure, etc.
Calculating the sensor readings
For those who are interested in the deeper
technical details, there is a 33K reference resistor on each sensor
port, which is used to determine the readings you get. The figure below
shows how the reference resistor is arranged. The Microcontroller
measures the voltage drop across the sensor, which can be calculated
from the following equation.
V = 5 x ( Rs / (33K + Rs))
Where Rs = Sensor resistance

Now, we know that if the voltage drop is 5v, we
get a reading of 1023. We can use the same equation to determine the
sensor readings directly.
Sensor Readings = 1023 x (Rs / (33k + Rs))
For example if our sensor has a resistance of
10k Ohm, our sensor reading will be:
1023 x (10000 / (33000 + 10000)) = 238
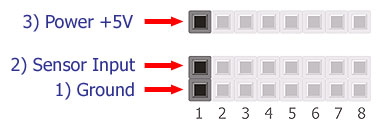
Sensor ports on the GoGo board
The GoGo board has eight sensor ports. Each of them has three pins, as shown in the illustration below.
Rows one and two (Ground and Sensor Input) are the ones most simple sensors use.
Row three is an
extra power supply for active sensors that needs a power source to function
properly.
Active and Passive Sensors
Sensors that have been mentioned so far are called
passive sensors. They do not need separate power to operate. Active
sensors, on the other hand, are sensors that need their own power. An easy
way to distinguish active sensors from passive ones is to count the
number of pins it has. Active sensors have an extra third pin to get the
power it needs while passive sensors have only two.
Active sensors are more complex, but they open
up a broad range of sensing possibilities. Examples of active sensors
include Infrared sensors [it detects presence, distance], Hall effect
sensors [detects
magnetic field], noise sensors, vibration sensors, etc.
Making Passive Sensors
Here you will see how to make three passive sensors: touch,
light, and temperature. All passive sensors only need two pins (pin 1
and 2 ).
Touch Sensors
Touch sensors are one of the simplest sensors but yet they are most
useful. The general ideas is very simple: you have two conductive
objects that would touch each other when activated (i.e. pressed,
stepped on) or vise versa. Here are some examples of touch sensors.
Paper and Aluminum foil.
This is probably the easiest way to make a touch sensor. You attach
some aluminum foil to two pieces of paper that are folded in a way that
will make the foil touch when pressed. You then connect one lead to each
foil. You can, of course, replace aluminum foil with other conductive
elements (i.e. paper clips or nails).

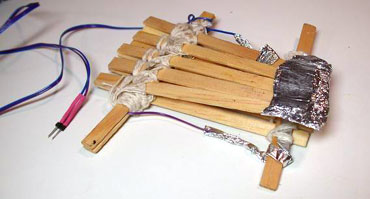
Ice-cream sticks and aluminum foil.
Ice-cream sticks are excellent for making simple structures. It is
stronger than paper. Therefor, when used with aluminum foil, we can make touch
sensors that are much more rigid. The following picture shows one
example.
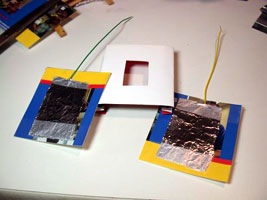
Sandwich touch sensors
Making this type of sensor you need two conductive contacts sandwiching a non-conductive
material. Overhead transparency films are nice as they are flexible. You
can stick or glue aluminum foil to them and use two of them to sandwich
a piece of cardboard paper. You punch holes in the cardboard allowing
the foils to touch when pressed.
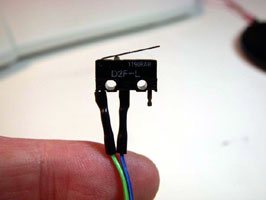
Commercial switches
You can also buy switches from electronic stores
and attach them to the GoGo board. These switches come in many shapes
and sizes. The most common ones are lever switches and push buttons.
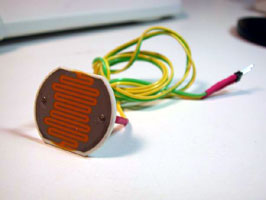
Light Sensors
The most common light sensor is called LDR (Light
Dependant Resistor). They are also known as "Photo cells." A LDR is
basically a resistor that changes its resistance when light intensity
changes. You often see them in automatic light stands.
Since LDRs are simply resistors, you can just
simply connect the two pins from the sensor to the GoGo board.
A Simple Humidity
Sensor
You can simply connect two wires or paper clips to
pins 1 and 2 of the GoGo board to measure humidity
in the soil. When the soil gets moist, it conducts more electricity.
Thus, the sensor readings you get will
change as the soil humidity changes. This same idea can be used to make
a water detector sensor. When the two wires touch water, the sensor
readings will change.
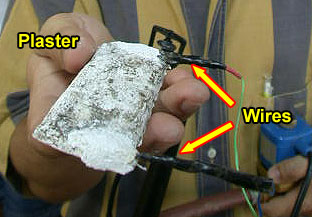
You can improve the humidity sensor by connecting the two wires to a
piece of gypsum, plaster, or any other material that absorbs water. The
idea is still the same but you are improving the purity of the
conductive medium. The sensor's behavior will not change too much from one
place to another. Gypsum is the material they use to make building
interiors (ceilings, walls, etc). Plaster is also used to cover walls
and to make a patient's cast.
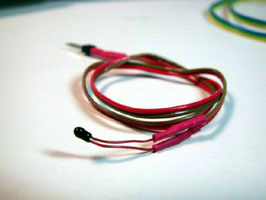
Temperature Sensors
To make a temperature sensor, you will need to
find a thermistor. Some thermistors are simply resistors that changes
their resistance as temperature changes. Other thermistors are active
sensors that need extra power to function.
Making Active Sensors
Here are examples of useful active sensors.
Reflective Light
Sensors
This type of sensor is useful when you want to
detect object presence without touching it. For example, you want to
detect when someone walks through a door, or when someone's hand gets
too close.
A simple idea for this sensor is to beam light on
to a LDR (light sensor). If something passes by, it blocks the light and
the LDR detects it. If the light source is a light bulb, then you are
simply detecting shadows. If you use a laser pointer as you light
source, you detection range can be very far and you readings will be
very precise.

There is another idea to accomplish the same
task. You can beam light outwards and measure the amount of light that
is
reflected back. When there is nothing to block the light, the
reflected light will be very small. However, if an object blocks the light,
it reflects more the light back. This is what we call a reflective
light sensor.
The benefit of this kind of sensor is that the sensor is located all in
one place and no alignment is needed when you change the direction of
the sensor.
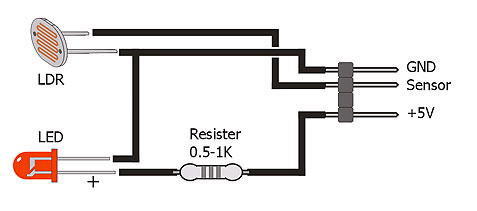
You can make reflective sensors simply with an
LED and an LDR. You need to use a bright LED. This works but the detection range will be limited
(less than 1 inch). There can also be a lot of interferences from external light sources as well.
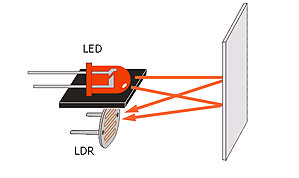
Here is a schematic of how this
sensor can be built for the GoGo board. The resistor is there to
limit the current that goes through the LED. The smaller the resistor
value
the brighter the LED.
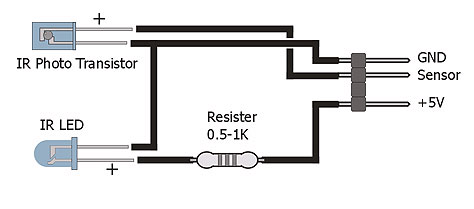
Using Infrared (IR) Light
A better version of the above reflective sensor
is to use Infrared light (IR), as there is much less interferences. IR is a kind of light that humans cannot see. This is nice when you
do not want people to see your sensor (i.e. in security systems).
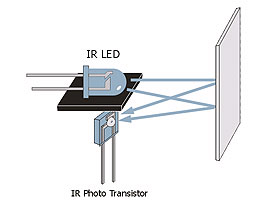
Notice in the diagram that we use an
IR phototransistor instead of the LDR. In this case, the two
functions the same way, but the IR phototransistor is much more
sensitive to IR light than an LDR. The following is a schematic of how
to build this sensor.
Commercial Reflective Sensors
You can also buy commercial IR reflective sensors
as well. They normally come in a compact size and the sensor readings
are more reliable.
[ example of commercial IR reflective sensors]
Here is an example of how to assemble a commercial IR reflective sensor (digikey.com partnumber QRD1114-ND).
Hall Effect (magnetic
field) Sensor
You can use this sensor to detect the presence of
magnets. The applications are similar to the IR reflective sensor but
they do not depend on light, which often means they are more reliable.
However, you need to have a magnet while light is almost everywhere.
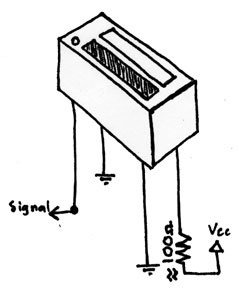
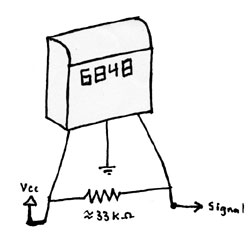
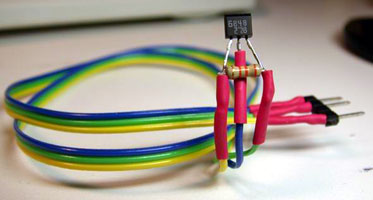
Here's an example of how to assemble a Hall
Effect sensor (from digikey.com, part number DN6848-ND)
Where to find sensors
In the US, many places sell
sensors. Radio shack is one of the most common places to look for. There
are also on-line stores that provides even larger collection of sensors.
Here is a list of a few websites that you should know:
Other references
|