Please send comments to Roger (arnans@media.mit.edu)
Parts required for the Continuum Car:
|
|
 In
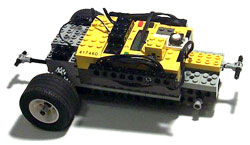
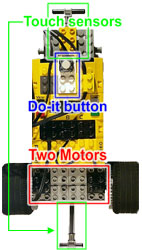
general, the continuum car requires two motors to drive two wheels
independently. This basically allows the car to turn. How these motors are
attached to the wheels are open for you to design. If no gearing is used,
the car will move and turn very fast, which can make it hard to control.
However, you can fine-tune how you want your car to react to the joystick
through the Tuning interface.
In
general, the continuum car requires two motors to drive two wheels
independently. This basically allows the car to turn. How these motors are
attached to the wheels are open for you to design. If no gearing is used,
the car will move and turn very fast, which can make it hard to control.
However, you can fine-tune how you want your car to react to the joystick
through the Tuning interface.
The Do-it button is a simple switch. When pressed, the car will playback the recorded movements programmed previously by the joystick. Because the button is a switch, you can replace it with any touch sensor if you do not have the part. See making your own do-it button.
The front and rear bumpers are optional. If installed, they will activate the car's behavior (or reaction) when pressed.
Attaching the parts to the RCX brick
|
Part |
Where to attach |
| 1. Lego motors | motor A and Motor B |
| 2. Do-it button | Sensor2 |
| 3. Joystick | Sensor1 |
| 4. Bumpers | Sensor3 (both the front and the rear sensors) |
After constructing the Lego car you will need to have both the Yellow Brick Logo and the RCX Car code downloaded to the RCX brick. Go to the download page if you do not have these necessary software.
- To download the Yellow Brick Logo firmware, open the "download.mw2"
file in Microworlds and follow the instructions on the screen.
- To download the RCX car code:
- Open "yellow brick logo.mw2" in Microworlds.
- Open the "RCX car code" text file
- Copy the text to the clip-board and paste it into "-procedures-" textbox in ybl.
- Type "Start" in the textbox above the "Download" button in ybl.
- Press the "Download" button. Make sure the RCX is on
|
|
Operating the Continuum Car Programming the car To program the car, you need to attach the joystick to sensor1. The car will start remembering the directions you give it immediately after you press the run (green) button on the RCX. When the memory is full (after 20 commands), the car will stop and beep. You can also program the car on the computer and then download it to the car. See car interface for details. Playback You simply hit the do-it button (attached to sensor2) and the car will execute the commands it had remembered. Usually the car will playback only once, but if you hold the do-it button for more than one second it will playback indefinitely. To stop the playback, hit the do-it button again (hold it down until you hear a beep.) Uploading commands to the Car interface The commands stored in the car can be uploaded to the computer. This allows you to see an iconic representation of your code. See the car interface for more details. Important note: The commands stored in the car will be erased if you stop the program or turn off the RCX brick.
|